
How to add color swatches in WooCommerce? Is it possible for a non-coder store manager or a beginner?
Yes, it’s possible. I’ll show you three simple steps to add WooCommerce product color variation swatches. Following these visual and easy steps, even a beginner can easily create attractive and interactive color swatches.
Let’s get in.
3 Easy Steps to Add Color Swatches in WooCommerce
As we want a beginner-friendly and no-code way to add Woo color variation swatches smartly, we need to install a good swatch plugin like Smart Swatches (Free).
Let’s install Smart Swatches for free from WordPress’s official plugin repository. If it’s your first time to install a plugin, you can read the documentation.
Step 1: Create WooCommerce Color Attributes
Smart Swatches (Free) allows even beginners to create advanced color attributes, variations, and swatches without writing code.
First, we need to create WooCommerce color attributes. Follow as seen in the image below.
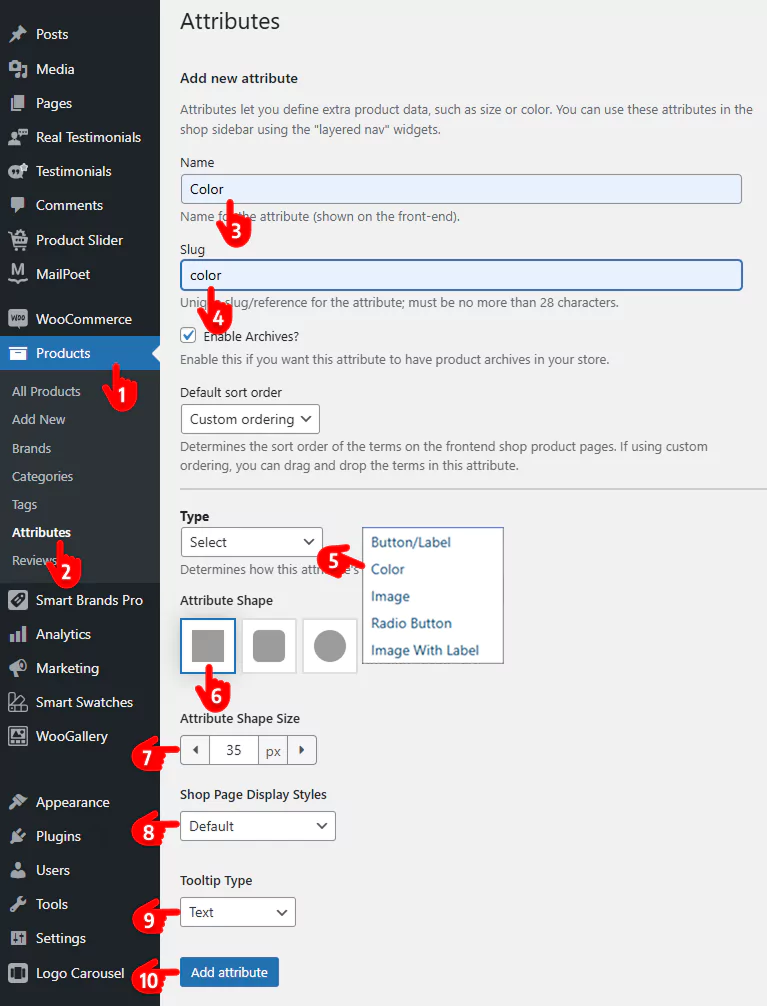
- First, click Products at your WordPress admin sidebar.
- Then, click Attributes.
- Name it Color.
- Add the slug.
- Choose a type. Color or Image is the best option. I chose the Color. That is to say, Smart Swatches offers this and the next options on this screenshot.
- Select an attribute shape.
- You can customize the attribute size.
- You can choose different swatch display styles for shop and archive pages.
- Choose a tooltip type.
- Click the “Add attribute” button.
This way, you can add as many WooCommerce attributes as you need, such as size, material, flavor, and brand. Upon adding the color attribute, it looks like the following.
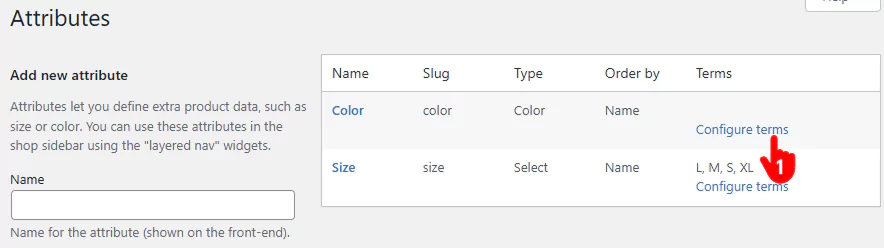
Click Configure terms and find the following color form to add colors. It will take you to the following screen.
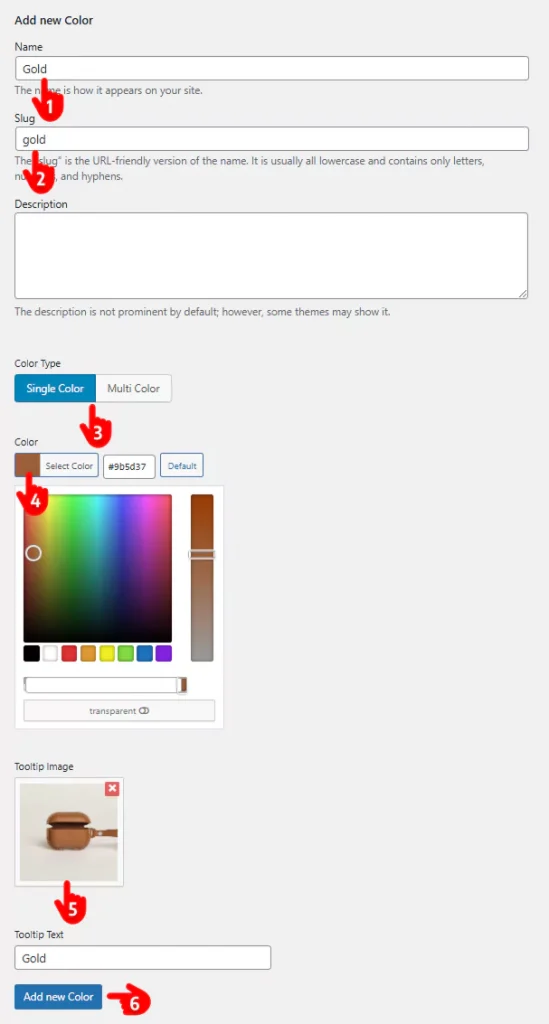
- Write the color name of the product you want to add as a variation. For example, I wrote Gold to show you the process.
- Add the slug.
- Select the Single Color option. Smart Swatches allows you to use the Multi Color option when you add colors for a multi-color product.
- Pick the perfect color of the product. A color picker can help you use the accurate color code of your product.
- You can also use image and text tooltips for your variation swatches.
- Click the “Add new color” button.
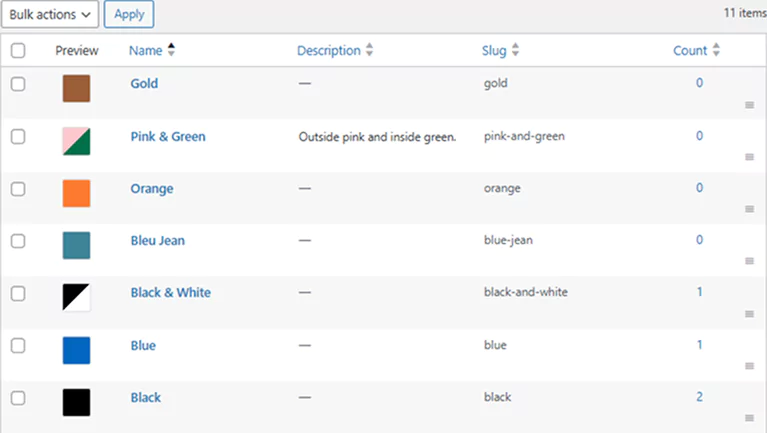
Thus, you can add as many colors as you need. I’ve added some colors, as seen below.
Step 2: Assign the Color Attributes to Your Products
Let’s assign the color attributes to their respective products.
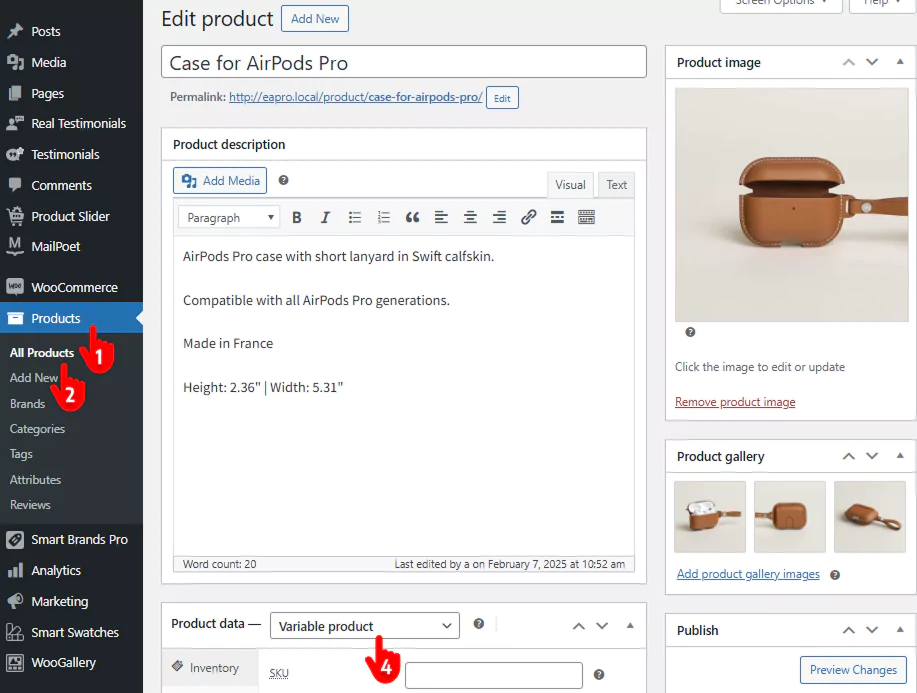
- First, click Products.
- Click All Products. It will show your product list. You can also assign attributes while adding new products.
- Click the product for which you want to add color variations and swatches.
- Scroll down to the Product Data section in the product form and pick up the “Variable product” from the dropdown list.
- Select the Attributes tab.
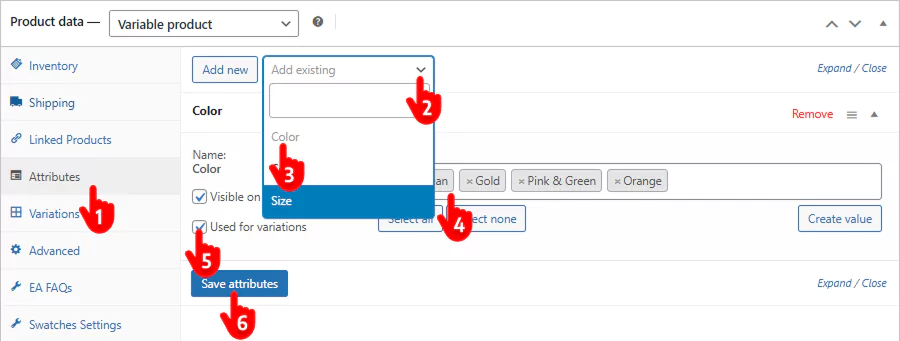
- Click the Add existing dropdown
- Select the Color.
- Click inside the color field and pick up the colors you want to add as variations.
- Check the Used for variations option.
- Click the Save Attributes button.
Step 3: Add color variations and swatches
Now, follow the simple steps below to add WooCommerce variable product images.
- First, select the Variations tab.
- Click Generate Variations. However, you can add variations manually by clicking the Add manually button.
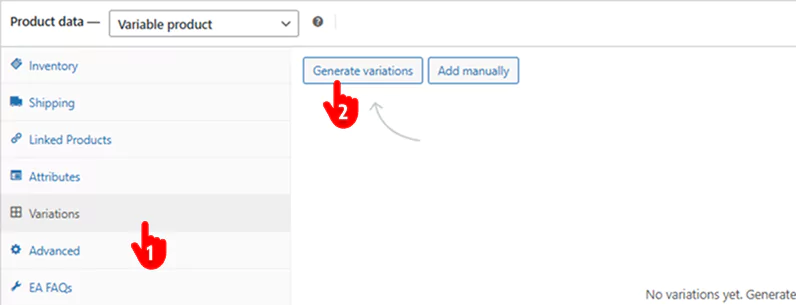
It will take you to the following screen.
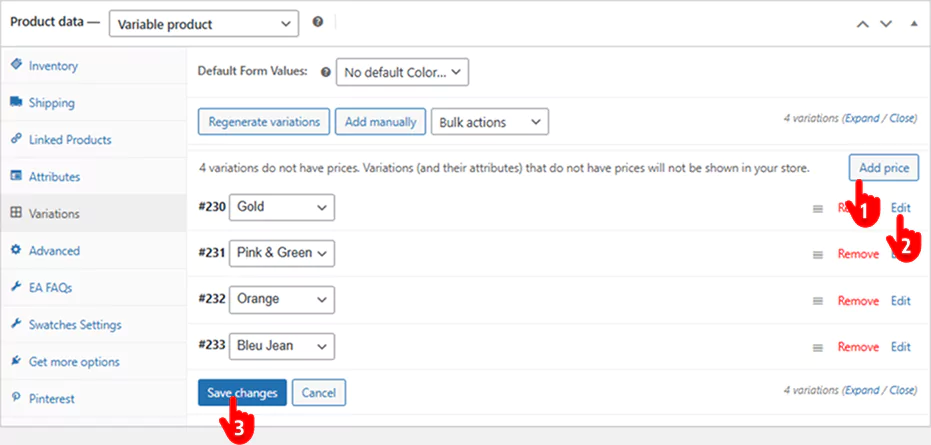
- Adding prices is a must. If the prices for all your variables are the same, you can add the price by clicking the Add Price button.
- However, if the prices are different, you can click Edit. This will display a detailed form for adding information, including the price. Fill out the form with the necessary information, including the required price.
- Click the Save Changes button.
- After adding all the color attributes and variations, click the Publish/Update button at the top right of your product form.
Go to the product page and refresh it. It looks like.
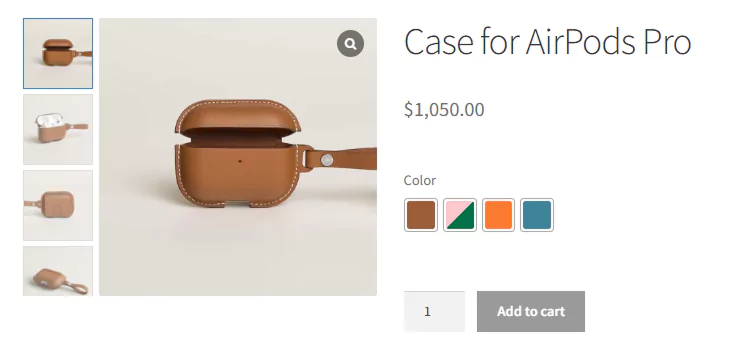
It looks and interacts awesome. Doesn’t it?
How to Add Dual-color Swatches in WooCommerce
Smart Swatches offers a multi-color option when you go to add colors to the color attributes. Go back to Step 1 above and add new colors the same way with the differences below.

- Choose the multi-color option.
- Pick two colors of your product.
We talked about single and dual colors above. What about the product of more than two colors?
How to Display Color Variations with Image Swatches
The image swatches are a must for stores that display the color swatches for products of more than two colors. Many stores prefer image swatches, even for single and dual-color products. They use the product images themselves as their color swatches.
Smart Swatches allows you to add product variation image swatches more easily than ever.
How to Reorder Color Swatches
You can order colors by Name, Name (Numeric), and Term ID. It also offers drag-and-drop custom ordering. Take a look at the image below.
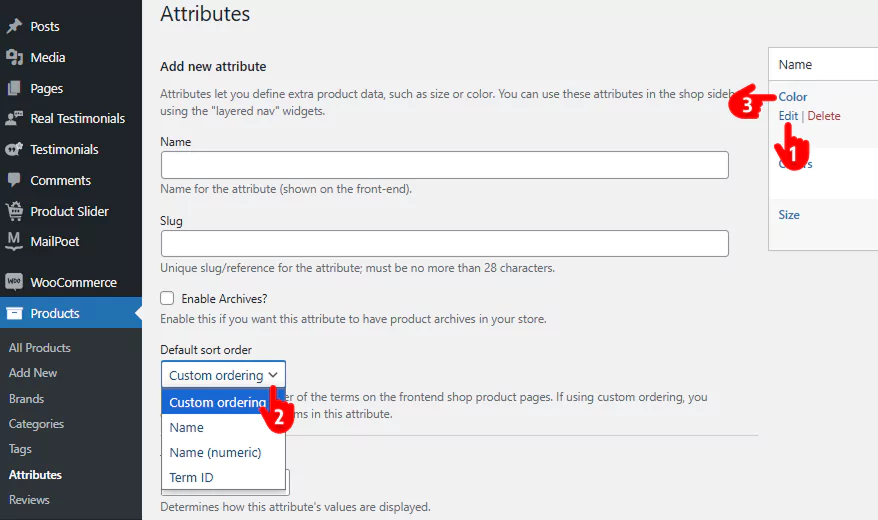
- Go to Attributes and click right on Edit (not Color) of the color attribute. You get the ordering options while adding a new attribute as well.
- Select the Custom Ordering option to order your color swatches by drag-and-drop. You can also order by name, name (numeric), or Term ID.
- Click the Update or Add attribute button while adding a new attribute.
- Click right on the Color (not Edit), then drag and drop to order the color swatches as seen below.
How to Add Color Attribute Filters in WooCommerce
It’s very simple. Follow the steps in the image below.
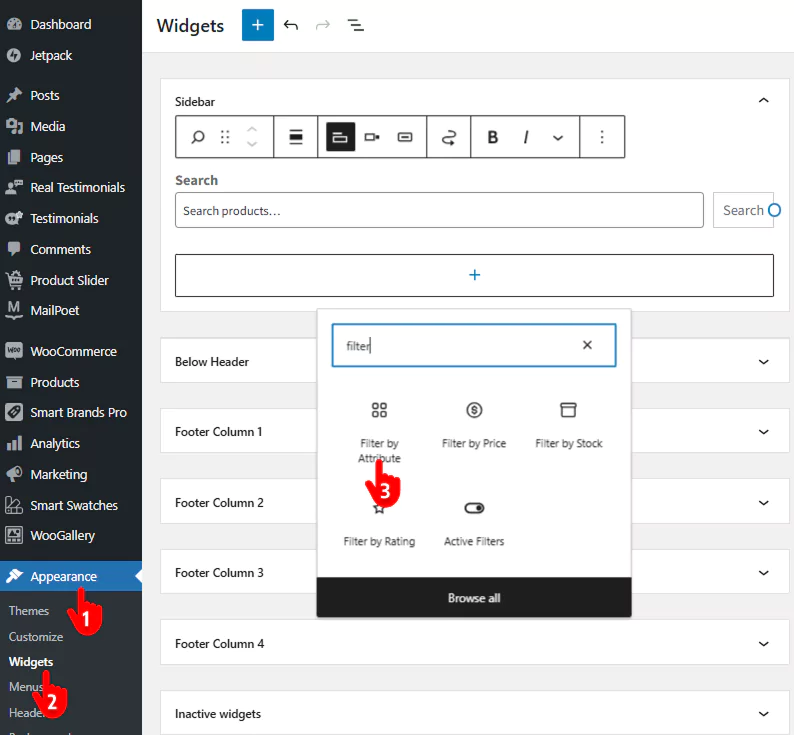
- First, click Appearance.
- Click Widgets.
- Add the Filter by Attribute widget on the sidebar. It will take you to the following widget.
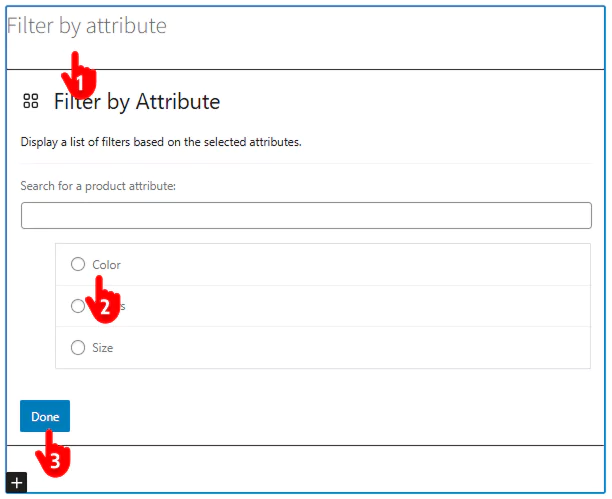
- Type Colors.
- Pick your Color attribute.
- Click Done.
- Hit the Update button at the top right, go to an archive page, and reload it.
It looks like.

You now know how to add color swatches in WooCommerce and many other relevant things very well. So, add color swatches smartly and boost your sales exponentially.
Leave a Reply